Testing Roslyn Analyzers and Code Fixes

I am a highly motivated and innovative software engineer with almost a decade of professional experience in software design and development. My main interests include architecting performant cloud-native solutions and optimizing the development experience for myself and my colleagues. I have extensive knowledge and understanding of the .NET ecosystem, including ample expertise in cloud technologies such as Microsoft Azure. In my spare time, I enjoy improving myself and the community by contributing to free and open-source software.
In the previous article, we implemented a Roslyn analyzer and code fix. This article will focus on various ways to properly test them. We will leverage existing test libraries and explore the means to write one ourselves using Roslyn workspaces. This will ensure our Roslyn components behave correctly and speed up our future development efforts.
The story so far
We have been calling ourselves self-proclaimed compiler development experts for a few weeks now. During this time, we managed to
alienate our colleagues by creating this really cool analyzer that will completely block any and all development efforts if multiple subsequent empty lines are encountered in our codebase,
enrage our boss by failing all of our builds and effectively shutting down our product development department, and
making a savior move by providing the ability to automatically fix all errors caused by the original analyzer.
And here we are. Our mouse is hovering over the Merge button. We are seconds away from either becoming a hero to our company or being sued by the legal department. Suddenly we hear a voice in our head. A long-dead Greek philosopher is speaking to us.
Quality is not an act. It is a habit.
Oh man, our psychologist warned us about this.
We slowly move the pointer away from the button and take a second to regroup. We make a decision then and there. From now on, we will test before we ship!
Why test at all?
I will not spend too much time defending the various reasons why testing is beneficial in software development. A list of reasons (pros, if you will) usually includes
ensuring the quality of the delivered product,
reducing flaws and unexpected behavior in the software,
making development easier and especially faster,
ensuring the stability of the codebase and allowing developers to refactor code safely (or at least safer), and
serving as living documentation, the kind that doesn't get outdated over time (at least in cases where tests are used as quality gates).
There are, of course, numerous resources available to you on the Wild Wild Web. For starters, navigate to the Microsoft Learn platform and find articles like this or that.
Testing Roslyn
I could have skipped the previous chapter and written a general article about testing instead. The thing is, Roslyn is a bit different. Roslyn is a compiler for all intents and purposes (well, for our purpose, at least). And you typically need a compiler to compile your code before you can test it. But we are testing the actions performed by the compiler. See the issue?

Okay, I'm exaggerating. Lucky for us, our compiler platform is entirely written C#. It is also open, extensible, and accessible enough to think of it as just any other .NET library. That being said, we need to be aware of some new concepts that testing a compiler will introduce.
Analyzers, code fixes, and other Roslyn extensions are typically encountered in projects. These reside in solutions open in various workspaces such as your Visual Studio IDE, JetBrains Rider, VS Code, or even the dotnet CLI. Finally, the actual diagnostic messages usually relate to a particular document in your project, such as the Program.cs application entry point.
To effectively test the compiler, we need to recreate all of these components, states, and actions for each of our unit tests.
Starting from scratch
Before we start, I want to assure you there are already several libraries and tools that can get you started with unit testing. If you are just looking for that initial push, jump to the next chapter where we go over the existing libraries used for testing.
If you are curious to learn how Roslyn works under the covers, this section will focus on building a straightforward and transparent means of testing Roslyn from the ground up.
Writing unit tests for our particular use case should be the same as what we usually do (and we do write unit tests, right?!).
Let's open up the analyzer solution we implemented in the previous articles and add a test project.
dotnet new nunit -f net7.0 -n RoslynTests
Head over to our `RoslynTests.csproj` project file next and add a reference to our analyzer and code fix project. The project file should now look something like this.
<Project Sdk="Microsoft.NET.Sdk">
  <PropertyGroup>
    <TargetFramework>net7.0</TargetFramework>
    <ImplicitUsings>enable</ImplicitUsings>
    <Nullable>enable</Nullable>
    <IsPackable>false</IsPackable>
  </PropertyGroup>

  <ItemGroup>
    <ProjectReference Include="..\EmptyLinesAnalyzerAndCodeFix\EmptyLinesAnalyzerAndCodeFix.csproj" />
  </ItemGroup>

  <ItemGroup>
    <PackageReference Include="Microsoft.NET.Test.Sdk" Version="17.3.2" />
    <PackageReference Include="NUnit" Version="3.13.3" />
    <!-- ... -->
  </ItemGroup>
</Project>
We have an NUnit testing project ready to run. Of course, you could easily use some other testing framework, such as XUnit or MSTest.
All actions performed in this article are done using the CLI or directly implemented in the code. Depending on which IDE you use, there may be a more convenient way of achieving the same things. The CLI approach, at least, will guarantee that the actions performed will work regardless of the platform or IDE being used.
Next, we need a NuGet package that will enable us to build virtual solutions. And, of course, let's remember our trusty FluentAssertions package. Run the following scripts.
dotnet add RoslynTests package Microsoft.CodeAnalysis.CSharp.Features
dotnet add RoslynTests package FluentAssertions
Essentially, we are writing unit tests for how the compiler treats our source code. Let's start with wrapping some code in the SourceText abstraction available from Microsoft.CodeAnalysis.Text namespace.
var source = SourceText.From("""
            namespace DemoConsoleApp;


            /// <summary> </summary>
            public class EmptyLines
            {
            }
            """);
For our benefit, we are using the raw string literal notation introduced with C# 11
Okay, so the source construct will be the unit we are testing. The first thing we need is to create a workspace.
Create a virtual workspace
As we learned in the first article of the series, the workspaces API acts as an entry point into our application. It exists to help us organize all the information about our source code. It ties everything into a neatly packed object model. It offers us direct access to the compiler layer and all the syntax and semantic information the compiler has. To put these words into a picture,
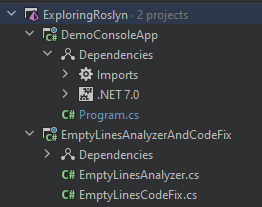
this is what we need to build. Only the entire workspace must exist for the short duration of running a single unit test.
When you see a solution like the one pictured above, it is usually built from a MSBuildWorkspace or one of its siblings such as VisualStudioWorkspace . While the used workspace type is generally specific to the workload or your development environment, these workspaces usually have at least one thing in common. They allow you, the developer, to point to a folder, a csproj, or a sln file and automatically load the entire workspace for you.
There is, however, another workspace AdhocWorkspace available in the NuGet package we installed just moments before. To quote the authors, it is "a workspace that allows full manipulation of projects and documents but does not persist changes". Perfect. This is precisely what we need to build our virtual workspace.
Let's start by creating a static class named RoslynTestExtensions and, in it, an extension method that will be responsible for creating the workspace. We are modeling a solution that will contain a single project. That project will include a single document, our source.
We will also need to provide our solution with some references. These allow us to access types and functionalities from external assemblies. Referencing System and System.Linq will do just fine for our use case.
private static readonly MetadataReference[] CommonReferences =
{
    MetadataReference.CreateFromFile(typeof(object).Assembly.Location),
    MetadataReference.CreateFromFile(typeof(Enumerable).Assembly.Location),
};
Let's also define a couple of default values. We know our solution will always contain a single project. This project will also have a single document containing our syntax.
private const string DefaultProjectName = "ProjectUnderTest.csproj";
private const string DefaultDocumentName = "SourceUnderTest.cs";
Now we have enough information to compile a simple workspace.
private static AdhocWorkspace CreateWorkspace(this SourceText source)
{
    var projectId = ProjectId.CreateNewId();
    var documentId = DocumentId.CreateNewId(projectId, DefaultDocumentName);

    var sourceTextLoader = TextLoader.From(
        TextAndVersion.Create(source, VersionStamp.Create()));
    var document = DocumentInfo
        .Create(documentId, DefaultDocumentName)
        .WithTextLoader(sourceTextLoader);

    var project = ProjectInfo.Create(
        id: projectId,
        version: VersionStamp.Create(),
        name: DefaultProjectName,
        assemblyName: DefaultProjectName,
        language: LanguageNames.CSharp)
        .WithCompilationOptions(new CSharpCompilationOptions(
            OutputKind.DynamicallyLinkedLibrary));

    var workspace = new AdhocWorkspace();
    var updatedSolution = workspace
        .CurrentSolution
        .AddProject(project)
        .AddMetadataReferences(projectId, CommonReferences)
        .AddDocument(document);

    workspace.TryApplyChanges(updatedSolution);

    return workspace;
}
A couple of things to note here.
one: Our project will be compiled as a dynamically linked library. This allows us to not worry about the compilation failing when our
sourcedoes not contain a validstatic void Main(...)application entry point.and two: If you look closely at the code, you can also notice that our
sourcecode,documentproject, andsolutionappear immutable. Looking back to what we discussed in the first article of the series, most of the basic Roslyn building blocks are, in fact, immutable. With one exception. A workspace provides access to all of the abovementioned building blocks. It is designed to change over time by supporting live interactions from the environment or via a call to theworkspace.TryApplyChanges(updatedSolution).
Find the diagnostic
Now that we have a solution, we can manipulate it and attempt to produce an analyzer diagnostic we are trying to test. Starting from the source text, we can create another extension method.
The extension method will return a collection of diagnostics in the source code. More specifically, only the diagnostics that the analyzer TAnalyzer is reporting. Using the standard Roslyn APIs, that is quite easy to achieve.
static async Task<ImmutableArray<Diagnostic>> GetDiagnostics<TAnalyzer>(this SourceText source) where TAnalyzer : DiagnosticAnalyzer, new()
{
    var workspace = source.CreateWorkspace();
    var document = /*the default document*/
    var analyzer = new TAnalyzer();
    var diagnosticDescriptor = analyzer.SupportedDiagnostics.Single();
    var compilation = await /*the default project*/.GetCompilationWithAnalyzerAsync(analyzer);
    var allDiagnostics = await compilation.GetAllDiagnosticsAsync();

    return allDiagnostics.Where(x =>
            x.Id == diagnosticDescriptor.Id &&
            x.Location.SourceTree?.FilePath == document.Name)
        .ToImmutableArray();
}
I will let you fill in the blanks. Feel free to check the
roslyn-playgroundrepository (link at the end of this article) if you get stuck anywhere.
We can now finally create a simple unit test to wrap everything up.
[Test]
public async Task EmptyLinesAnalyzer_ShouldReportDiagnostic_WhenMultipleEmptyLinesExist()
{
    // Arrange
    var source = /*we know this already*/

    // Act
    var actual = await source.GetDiagnostics<EmptyLinesAnalyzer>();

    // Assert
    actual.ShouldContainDiagnosticWithId("DM0001");
}
Ahh, one bit is missing. Let's create another extension method ShouldContainDiagnosticWithId . It should receive an ImmutableArray of Diagnostics, and properly assert the existence of a diagnostic with a provided Id.
static void ShouldContainDiagnosticWithId(this ImmutableArray<Diagnostic> diagnostics, string diagnosticId)
{
    diagnostics.Should().NotBeNull().And.HaveCountGreaterOrEqualTo(1);
    diagnostics.Should().Contain(diagnostic => diagnostic.Id == diagnosticId);
}
✅ Let's move on!
Apply the code fix
We can use a similar approach for testing our code fix. Since we know our diagnostic contains an accompanying code fix, it gives us a perfect place to start modifying the virtual solution.
Similarly to what we did when testing the diagnostic in the previous chapter, we need to find the diagnostic to fix. Let's assume we are left with a singleDiagnostic that was reported by the analyzer under test. Because we checked that the diagnostic has the correct id, we also know that our TCodeFixProvider supports a code action to fix it.
I suppose we are making way too many assumptions at this point. Naturally, our code will have proper validation in place so that nothing will be left to chance 😉.
static async Task<SourceText> ApplyCodeFixes<TAnalyzer, TCodeFixProvider>(this SourceText source)
where TAnalyzer : DiagnosticAnalyzer, new()
where TCodeFixProvider : CodeFixProvider, new()
{
    // create the workspace, find the diagnostic, and ...
    await workspace.ApplyCodeFix<TCodeFixProvider>(document, singleDiagnostic);

     return /*the modified source*/
}
The only thing left to do is to implement the ApplyCodeFix<TCodeFixProvider> extension method.
If you remember the article where we implemented the code fix provider, we needed to implement the CodeFixProvider abstract class. As a part of that implementation, we implemented the RegisterCodeFixesAsync(CodeFixContext) method. This will be our access point to the code fix provider.
We can surely create an instance of the CodeFixContext since we have all the needed building blocks. A point of interest for us is the registerCodeFix argument. This delegate gets invoked whenever the code fix encounters a fixable diagnostic. As a result, we are left with a CodeAction.
This is something we are already familiar with. Remember, a code action contains all the information needed to apply the fix to our solution. This is achieved through the set of operations it exposes. Calling codeAction.GetOperationsAsync will enable us to access the ApplyChangesOperation, which will contain a ChangedSolution . This is the fix we need. The only thing left is to apply that changed solution to our workspace.
💡I, for one, love it when things start falling into place.
Let's type this up real quick.
static async Task ApplyCodeFix<TCodeFixProvider>(this AdhocWorkspace workspace, Document document, Diagnostic singleDiagnostic)
where TCodeFixProvider : CodeFixProvider, new()
{
    var codeFixProvider = new TCodeFixProvider();
    List<CodeAction> actions = new();
    var context = new CodeFixContext(document,
        singleDiagnostic,
        (a, _) => actions.Add(a),
        CancellationToken.None);
    await codeFixProvider.RegisterCodeFixesAsync(context);
    foreach (var codeAction in actions)
    {
        var operations = await codeAction.GetOperationsAsync(CancellationToken.None);
        if (operations.IsDefaultOrEmpty)
        {
            continue;
        }

        var changedSolution = operations.OfType<ApplyChangesOperation>().Single().ChangedSolution;
        workspace.TryApplyChanges(changedSolution);
    }
}
Again, we have everything we need in place to finally write the unit test. The following snippet is self-explanatory.
[Test]
public async Task EmptyLinesCodeFix_ShouldApplyFix_WhenMultipleEmptyLinesExist()
{
    // Arrange
    var source = SourceText.From("""
        namespace DemoConsoleApp;


        public class EmptyLines
        { }
        """);
    var expected = SourceText.From("""
        namespace DemoConsoleApp;

        public class EmptyLines
        { }
        """);

    // Act
    var actual = await source.ApplyCodeFixes<EmptyLinesAnalyzer, EmptyLinesCodeFix>();

    // Assert
    actual.ShouldBeEqualTo(expected);
}
✅ Pass. We are done.
Well, not quite. As mentioned, the approach we just implemented was meant to demonstrate how Roslyn works and should not be considered a valid approach to test your analyzers and code fixes (please). Let's look at how testing should actually be attempted.
Using Roslyn's testing library
Luckily for us, we can skip the previous chapter altogether. The team behind Roslyn provides a comprehensive suite of utilities designed to test analyzers, code fixes, and other components.
Getting started here is easy. Make sure you install the library first.
dotnet add RoslynTests package Microsoft.CodeAnalysis.CSharp.CodeFix.Testing.NUnit
Keep in mind that similar packages also exist for XUnit and MSTest.
The only thing we are left with is to use a verifier for the code fix we want to test. We can be tricky here and create an alias for the verifier.
using EmptyLinesAnalyzerAndFix;
using Microsoft.CodeAnalysis.Text;

namespace RoslynTests;

using Verify = Microsoft.CodeAnalysis.CSharp.Testing.NUnit.CodeFixVerifier<EmptyLinesAnalyzer, EmptyLinesCodeFix>;

public class EmptyLinesTests
{
    // ...
}
The previous test can now be rewritten to use the CodeFixVerifier like so.
[Test]
public async Task EmptyLinesCodeFix_ShouldApplyFix_WhenMultipleEmptyLinesExist()
{
    // Arrange
    var source = /*...*/
    var expected = /*...*/
    var diagnostic = Verify.Diagnostic()
        .WithSpan(startLine: 2, startColumn: 1, endLine: 4, endColumn: 1)
        .WithSpan(startLine: 4, startColumn: 1, endLine: 4, endColumn: 7);

    // Assert
    await Verify.VerifyCodeFixAsync(source, diagnostic, expected);
}
Two things to note. The Verify alias already knows the diagnostic we are testing. The only thing we are left with is to define where the diagnostic is supposed to occur. The WithSpan extension, along with numerous other extensions, can be used to specify the constraints of the diagnostic we are testing.
That's all good, but aren't we supposed to get a single diagnostic in this test? Why are we specifying two locations, then?
Looking back at the article where we implemented the analyzer, we added an additionalLocation that was later used by the code fix provider. This is the second span we want to test for.
Calling the Verify.VerifyCodeFixAsync will cycle over numerous verifications that will generally go over the same steps we went over in the previous chapter. Only the verifications executed here are far more precise and elaborate. The documentation in the Roslyn repository is a great entry point if you wish to explore the numerous capabilities of the testing library further.
We intentionally skipped testing the analyzer, since the library also provides the same assertions when testing an accompanying code fix provider. General guidelines and best practices for using the Roslyn test library suggest testing only the code fix provider when possible.
If this is not possible, you can freely use the
AnalyzerVerifierfrom the Analyzer NuGet package, to test the analyzer on its own.
But wait, there's more.
Streamline testing using the Roslyn testing library
There are various cool and somewhat undocumented features included in this testing library. A couple of them, at least, can significantly streamline your test development.
The testing library supports a special markup syntax to aid in your test development.
Let's take the test of our code fix provider (the one above). Instead of explicitly creating a Diagnostic() with expected spans, we can embed that information into the source code.
var source = """
    namespace DemoConsoleApp;
    {|DM0001:

    |}public class EmptyLines
    { }
    """;
Notice the {|DM0001: ... |} markup, which tells the verifier that there is an expected diagnostic with the id DM0001 supposed to appear in the same position as denoted by the brackets.
The assertion part can, therefore, also be simplified since the diagnostic was implicitly created for us by the library.
await Verify.VerifyCodeFixAsync(source, expected);
We can use similar syntax to specify the location of any reported diagnostic using an alternative bracket markup [| ... |] .
[Test]
public async Task EmptyLinesAnalyzer_ShouldReportDiagnostic_WhenMultipleEmptyLinesExist_UsingRoslynLibraryCustomSyntax()
{
    // Arrange
    var source = """
        namespace DemoConsoleApp;
        [|

        |]public class EmptyLines
        { }
        """;

    // Assert
    await Verify.VerifyAnalyzerAsync(source);
}
Pretty cool, right?! Now replace the above markup with a marker $$ that specifies the expected location of a diagnostic. We have another passing test ✅.
var source = """
    namespace DemoConsoleApp;
    $$

    public class EmptyLines
    { }
    """;
In summary
We managed to get our hands dirty with Roslyn's workspaces. This API gave us enough insight into code analysis in C#. Additionally, we learned how to properly and easily test our inventions.
If you made it this far, head over to the denisekart/exploring-roslyn repository and start exploring⭐.
... As the sun is starting to rise, we glance at our updated merge request. Soothing green light from the generated code coverage report shines blissfully in our eyes. As we move our mouse closer to the Merge button, we wonder. What other secrets lie beneath this compiler's shining API?
Until next time, ✌